Inventory
To Create a New Item
Click Inventory on the navigation bar
From the drop-down menu select the Create Item button
 and the Create New Item page is displayed:
Enter Item Description
Upload an Item Image (if required)
Select Default Location (where items are usually stored)
Select the Shelf
Select the Vendor the Item is purchased from
Select the sub-type
Select V.A.T.
Select Unit of Measure
Enter Average Cost
Select Outlet (if required)
Create Item button to create the item
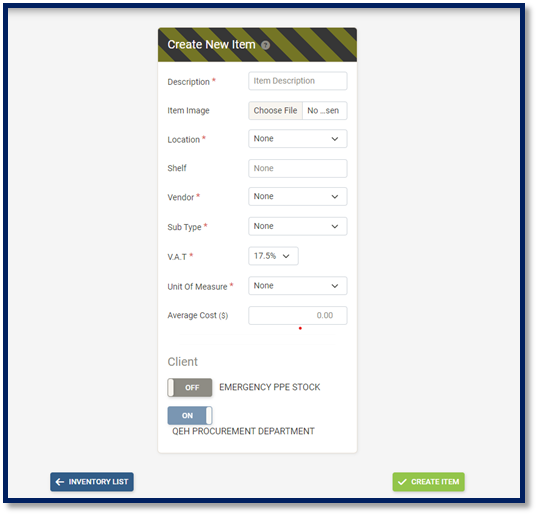
Note: Please note all fields displayed on the page except Item image and Shelf are required.
To Search, Edit and View the Inventory List
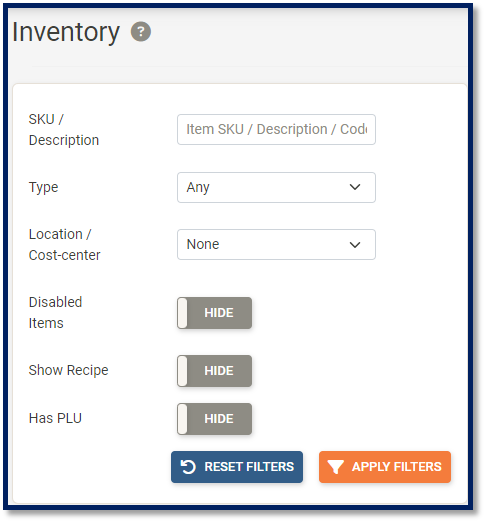
Click Inventory on the navigation bar
From the drop-down menu select Inventory List
 button and the Inventory List is displayed:
Search by SKU, by Description or Barcode
Search by Type
View Disabled Items
Show Recipe
Has PLU
Apply Filters button to search for items
Reset Filters button to remove all filters
Actions button to Create Item
Actions button to Import Inventory
Actions button to Export Client Inventory
Actions button to Export Inventory
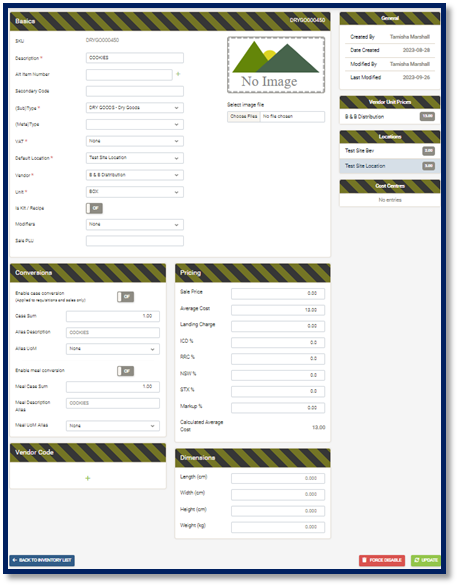
To edit an item on the Inventory List, select the Edit Item
 button and the Edit Item page is displayed:
Basics
Change Item Description
Add Alternate Item Number
Add Secondary Code
Change Sub-Type (Changing the sub-type changes the SKU leters)
Change Meta-Type
Change V.A.T. amount
Change Default Location
Change Default Vendor
Change Unit of Measure (UOM)
Enable/Disable Is Kit/Recipe option
Select a Modifier
Enter Sale PLU
Upload Item Image
Conversions
Enable/Disable Case Conversions (if required)
Enter Case Sum (if required)
Enter Alias Description (if required)
Select Alias UOM (if required)
Enable/Disable MeaL Conversions (if required)
Enter Meal Case Sum (if required)
Enter Meal Description Alias (if required)
Select Meal UOM Alias (if required)
Pricing
Enter Sale Price (if required)
Enter Average Cost (if required)
Enter Landing Charge
Enter ICD%
Enter RRC%
Enter NSW%
Enter STX%
Enter Markup%
Calculated Average Cost
Dimensions
Enter Length (cm)
Enter Width (cm)
Enter Height (cm)
Enter Weight (cm)
Vendor Code
Click the green plus sign to add a new vendor and Code
Select a Vendor
Enter new vendor Code
Update button to save
Force Disable button to disable items (Only visible if the item has zero quantity)
Enable button to enable items
Back to Inventory List
To Search, Edit and View Items via Locations
Items can also be searched via the Locations
 buttons under the Inventory drop-down menu
On the Locations page users can:
Search for items by SKU or Description
Select the Location
Search Items with zero stock
Apply Filters button to search for items
Reset Filter button to remove all filters
Change Active and Non-Active on an item
Edit Item button to adjust item quantity on hand
Edit Minimum (Re-Order) Level
Edit Par Level
Edit Maximum Level
Select Shelf
Update
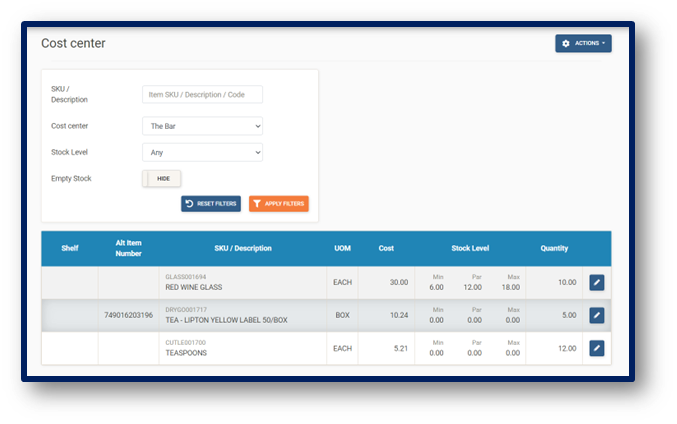
**To Search, Edit and View Items via Cost Centers
Items can also be searched via the Cost Centers |Cost Centres.png| buttons under the Inventory drop-down menu
On the Cost Centers page users can:
Search for items by SKU or Description
Select the Location
Search Items with zero stock
Apply Filters button to search for items
Reset Filter button to remove all filters
Change Active and Non-Active on an item
Edit Item button to adjust item quantity on hand
Edit Minimum (Re-Order) Level
Edit Par Level
Edit Maximum Level
Select Shelf
Update